‘No CAPTCHA reCAPTCHA’ using ColdFusion

Recently Google introduced new reCaptcha API called “No CAPTCHA reCAPTCHA” . Its a complete new design captcha system. This protects your website for spammers and robots. As per Google,

While the new reCAPTCHA API may sound simple, there is a high degree of sophistication behind that modest checkbox. CAPTCHAs have long relied on the inability of robots to solve distorted text. However, our research recently showed that today’s Artificial Intelligence technology can solve even the most difficult variant of distorted text at 99.8% accuracy. Thus distorted text, on its own, is no longer a dependable test.

Now using this new captcha system users do not need to identify a complex distorted text string to prove themselves as human being. Sometimes it becomes too much irritating when the text strings are very much distorted even difficult to recognized by human beings. As per the new catacha system users just need to click on checkbox to identify themselves as human being.

Google does say that this won’t entirely do away with CAPTCHAs — there may still be times when you’ll be asked to enter some text as well.

Google’s new reCATPTCHA system makes use of an advanced risk analysis engine to identify humans and robots.The idea here is to track user’s actions before, during and after ticking the check box saying “I’m not a robot“. Basically it checks how the cursor moved on its way to the check (organic path/acceleration), which part of the checkbox was clicked (random places, or dead on center every time), browser fingerprint, Google cookies & contents. At the end of the day, if it’s not sure, it will still offer you traditional CAPTCHA .

Here is how Google’s new reCAPTCHA looks like.

 newCaptchaAnchor

Sometime if it can not verify only by clicking the checkbox it presents with the old traditional captcha, Re

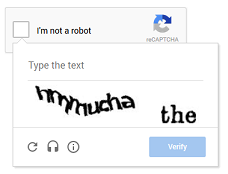
In this post I had implemented new reCaptch API system with HTML login form using ColdFusion.

Steps:

1. Click Here to to create a Google reCaptcha application.

register

2. After this step you will be provided with google site key and secret key. The site key will be used in our HTML form as a hidden field and secret key will be used for communication between our site and google.

keys

Algorithm:

  1. Add the google site key to the form with a hidden field. Example,
  2. <div class="g-recaptcha" data-sitekey="6LctadUSAAAAAI81jKmWaBFGWwMky64xbBGhVl8L"></div>
  3. When the user clicks on the check box, an ajax request will be automatically sent to the server and validate the CAPTCHA, if it is valid mark it as in use. (Show the result – identifier is OK/not OK – to the user)
  4. When the user sends the form, the form’s data contains the identifier. Check it once more on the server side by making a http request to google, it should exist and it should be in in use state.
  5. If all validations are succeeded , the form’s data is ready to use/process

Here is the quick demo I have implemented using ColdFusion.


<cfparam name="FORM.username" default="" type="string" >
<cfparam name="FORM.password" default="" type="string" >
<cfif structKeyExists(FORM,"submit")>
<cfset recaptcha = FORM["g-recaptcha-response"] >
<cfif len(recaptcha)>
<cfset googleUrl = "https://www.google.com/recaptcha/api/siteverify"&gt;
<cfset secret = "6LctadUSAAAAAM7NPoPq5jlbm3a37ib3sHlRFyNE">
<cfset ipaddr = CGI.REMOTE_ADDR>
<cfset request_url = googleUrl & "?secret=" & secret & "&response=" & recaptcha & "&remoteip" & ipaddr>
<cfhttp url="#request_url#" method="get" timeout="10">
<cfset response = deserializeJSON(cfhttp.filecontent)>
<cfif response.success eq "YES">
<!— Start validating the username/password here. —>
</cfif>
</cfif>
</cfif>
<!DOCTYPE html>
<html>
<head>
<script src='https://www.google.com/recaptcha/api.js'></script&gt;
</head>
<body>
<form method="post">
UserName:
<input type="text" name="username">
<br><br>
Password:
<input type="password" name="password">
<br><br>
<div class="g-recaptcha" data-sitekey="6LctadUSAAAAAI81jKmWaBFGWwMky64xbBGhVl8L"></div>
<input type="submit" value="Submit" name="submit">
</form>
</body>
</html>

view raw

reCAPTCHA.cfm

hosted with ❤ by GitHub

‘this.datasource’ is awesome in ColdFusion 11

Normally In ColdFusion applications we set up the datasources in ColdFusion Administrator or using the Admin API.So this makes very difficult for our Application to be portable across different ColdFusion server. Because while migrating to another ColdFusion server first of all we have to recreate all the datasources again.

(Note: Once I have tried to back up all my datasources using the neo-datasource.xml file(which stores all datasource info) of my old CF server. But that does not works because of the password encryption/decryption issues.By password encryption issues, I mean the database password that we give while creating a datasource, this password gets stored in encrypted format in our ColdFusion server.So if we migrate our neo-datasource.xml file from Old CF server to new CF server , The new CF server can not decrypt those passwords properly.)

ColdFusion 11 brings a new features for creating datasources in application level instead of messing up with CF Admin.
We can define all our datasource details in Application.cfc.

 this.datasources.dsn1 = {  "database"="regression",
                   "host"="localhost\MSSQL2008", 
                   "driver"="MSSQLServer", 
                   "username"="sa", 
                   "password"="mindfire" };
 
 this.datasources.dsn2 = {   "driver"="MSSQLServer", 
                   url="jdbc:macromedia:sqlserver://localhost\MSSQL2008; 
                   databaseName=regression; 
                   sendStringParametersAsUnicode=false; 
                   querytimeout=0; 
                   MaxPooledStatements=1000", 
                   "username"="sa", 
                   "password"="mindfire"};  

If you are using built in DB drivers that are shipped with ColdFusion , then just specify the driver name and the corresponding driver class will be picked up by ColdFusion. In neo-drivers.xml, you can find all the possible values for the driver.

But if you are using your own custom driver, you can use this syntax.

this.datasources.customDSN = { "driver" = "other", 
                 "url" = "jdbc:sqlserver://localhost\MSSQL2008; 
                 databaseName=pubs; 
                 sendStringParametersAsUnicode=false; 
                 querytimeout=0; 
                 MaxPooledStatements=1000", 
                 "username" = "sa", 
                 "password" = "password", 
                 "class" = "com.microsoft.sqlserver.jdbc.SQLServerDriver"}; 

Note: But If there is a server wide datasource with the same name exist, then application level datasource will be overridden by server level datasource.

Playing with Scope Inheritance In Angular

In my previous blog I have discussed about the prototypical inheritance in Javascript, In AngularJS, a child scope normally prototypical inherits from its parent scope.Today while working with angular I found a interesting concept regarding prototypical inheritance in angular. Now lets directly start with an example,


<html ng-app="sampleApp">
<head>
<script type="text/javascript" src="https://ajax.googleapis.com/ajax/libs/angularjs/1.3.0/angular.min.js"></script&gt;
<script type="text/javascript">
var sampleApp = angular.module("sampleApp", []);
sampleApp.controller('sampleCtrl', ['$scope',
function($scope) {
$scope.skills = ["Java", "C", "C++", "PHP", "ColdFusion"];
$scope.mySkill = "Java";
}
])
</script>
</head>
<body ng-controller="sampleCtrl">
<ul>
<li ng-repeat="skill in skills">
<input type="radio" name="sudents" ng-model="mySkill" ng-value="skill">{{skill}}
</li>
</ul>
Selected Value is: {{mySkill}}
</body>
</html>

Here is the PLUNK.

In the above example We have created an array “Skills” which contains a set of skills, and a model “mySkill” to store a particular skill in $scope. We are using the “Skills” array to populate our check boxes and ‘mySkill’ model to store the skill selected by the user.Finally we are showing the skill selected by the user. But this will not work the way we are  expecting.

It will not update our model ‘mySkill’ according to the checkbox selected by the user. This looks like a strange issue. Now the question is why Its not updating our model properly? This is because ng-repeat creates a new child scope which is prototypically inherited from parent scope and the child scope gets its own property(‘mySkill’) that hides/shadows the parent property of the same name, But does not update the parent scope ‘mySkill’ property. This is not something AngularJS is doing – this is how JavaScript prototypical inheritance works.  Directives like ng-repeat, ng-view and ng-include create new child scope where this kind of problem occurs.

This issue with primitives can be easily avoided by following the best practice of always have a ‘.’ in ng-models.Having a ‘.’ in models will ensure that prototypical inheritance is in play. So, we should use

<input type="text" ng-model="someObj.prop1"> rather than 
<input type="text" ng-model="prop1">.

If you really want/need to use a primitive, then we can use $parent.parentScopeProperty in the child scope which will prevent the child scope from creating its own scope.

<input type="text" ng-model="$parent.prop1">

Now to make our example work properly we can modify it as below,


<html ng-app="sampleApp">
<head>
<script type="text/javascript" src="https://ajax.googleapis.com/ajax/libs/angularjs/1.3.0/angular.min.js"></script&gt;
<script type="text/javascript">
var sampleApp = angular.module("sampleApp", []);
sampleApp.controller('sampleCtrl', ['$scope',
function($scope) {
$scope.skills = ["Java", "C", "C++", "PHP", "ColdFusion"];
$scope.mySkill = {fav: "Java"};
}
])
</script>
</head>
<body ng-controller="sampleCtrl">
<ul>
<li ng-repeat="skill in skills">
<input type="radio" name="sudents" ng-model="mySkill.fav" ng-value="skill">{{skill}}
</li>
</ul>
Selected Value is: {{mySkill.fav}}
</body>
</html>

Here is the PLUNK.

So what exactly we did is we have modified  $scope.mySkill = “Java” to $scope.mySkill = {fav: “Java”} and used mySkill.fav as our model. So now inside ng-repeat It will not create a duplicate mySkill property in the child scope instead it will update the parent scope mySkill.fav property and everything will work as expected.

This is one of the “Best Practices” in Angular JS.

Summary:

If we use a primitive type (as ‘mySkill’ in 1st example) as model for data binding, essentially ng-repeat will create a new child scope property with the same name . Changing the child scope property’s value (i.e., using ng-model, hence child scope property mySkill) does not change the  parent scope mySkill property. So in my first example above, each child scope gets a mySkill property that is independent of the mySkill property defined in the controller or the parent scope. But if we will use a Object type , It will use prototypical inheritance and always update the property on the parent scope.

Custom Validation In Angular Js

Angular JS having very strong support for form validation. It’s having builtin $error object,predefined CSS classes and patterns that makes the form validation much easier. Still there are plenty of cases where we can not use angularjs default validation.Its off course not possible to cover all the cases.

So we can write up our own custom directives for adding custom validation to our application.What we really want to do is to build a directive that will require ngModel(require: ‘ngModel’). Requiring ngModel will pass the ngModelController into the linking function as the fourth argument. The ngModel controller has a lot of handy functions on it, in particular there is $setValidity, which allows us to set the state of a model field has $valid or $invalid as well as set an $error flag.
The ng-model directive provides two arrays of functions to which the custom validation logic can be hooked:i.e

  1. $parsers
  2. $formatters

Usage of both of these arrays looks similar, but they are invoked under different conditions.

$parsers:

Array of functions to execute, as a pipeline, whenever the control reads value from the DOM. Each function is called,
in turn, passing the value through to the next. The last return value is used to populate the model. Used to sanitize /convert the value as well as validation. For validation, the parsers should update the validity state using $setValidity(), and return undefined for invalid values.

In most of the cases, $parsers is the right option to handle the logic of custom validation. Functions added to $parsers are called as soon as the value in the form input is modified by the user.

$formatters:

Array of functions to execute, as a pipeline, whenever the model value changes. Each function is called, in turn, passing the value through to the next. Used to format / convert values for display in the control and validation.
Formatters are invoked when the model is modified in the code. They are not invoked if the value is modified in the textbox. $formatters are useful when there is a possibility of the value getting modified from the code.

Example:

Suppose we want to validate our username. It must be alphanumeric only.


sampleApp.directive('myUsername', [ function(){
// Runs during compile
return {
require: 'ngModel',
restrict: 'A',
link: function($scope, iElm, iAttrs, controller) {
controller.$parsers.unshift(function(value){
//allow only alphanumeric characters
var reg = /^\w+$/ ;
var isValidUsername = reg.test(value);
controller.$setValidity('username',isValidUsername);
return isValidUsername? value:undefined;
});
controller.$formatters.unshift(function(value){
var reg = /^\w+$/ ;
var isValidUsername = reg.test(value);
controller.$setValidity('username',isValidUsername);
$scope.registrationForm.username.$setViewValue($scope.registrationForm.username.$viewValue);
return value;
})
}
};
}]);


<input type="text" name="username" ng-model="userData.username" ng-model-options="{updateOn: 'blur'}" my-username>&nbsp;&nbsp;
<span ng-show="registrationForm.username.$dirty && registrationForm.username.$error.username">
Invalid Username.
</span>

view raw

form.html

hosted with ❤ by GitHub

Though we can achieve the same kind of validation easily using ng-pattern, I have shown this example just for the demo purpose to show how $parser and $formatter works. Here is the PLUNK.

How Two Way Data Binding works in Angular JS

Two way data binding is one of the most powerful feature in Angular JS.It will help you to save from writing a lots of regular code.

What does it mean by two-way data binding?

In simple words, two way data binding means AngularJs synchronizes the data between the scope model and veiw.
It means if a value of a scope model changes it automatically updates the same value in the view and similarly if the value in the view changes it automaticaly updates the value in the scope model.

How does two way data binding works in Angular JS?

two wayWhen we write an expression ({{dyanvar}}), behind the scenes Angular sets up a watcher on the scope model, which in turn updates the view whenever the model changes. This watcher is like any other watcher we set up in AngularJS:

$scope.$watch('dyanvar', function(newValue, oldValue) {
  //update the view with newValue
});

The second argument passed to $watch() is known as a listener function, and It is called whenever the value of dyanvar changes.

When the value of dyanvar changes this listener is called, updating the expression in HTML.
But still,How does Angular figure out when to call this listener function? In other words, how does AngularJS know when {{dyanvar}} changes so that it can call the corresponding listener? Does it run a function in a particular interval to check whether the value of the scope model has changed or not ? Well, this is where the $digest cycle comes into the picture.

It’s the $digest cycle where the watchers are fired. When a watcher is fired, AngularJS evaluates the scope model, and if it has changed its value then the corresponding listener function is called. So, Now the question is when and how this $digest cycle starts.

The $digest cycle starts as a result of a call to $scope.$digest(). Assume that we change a scope model in a handler function through the ng-click directive. In that case AngularJS automatically triggers a $digest cycle by calling $digest(). When the $digest cycle starts, it fires each of the watchers. These watchers check if the current value of the scope model is different from last calculated value. If yes, then the corresponding listener function executes. As a result, if you have any expressions in the view they will be updated. In addition to ng-click, there are several other built-in directives/services that let us change models (e.g. ng-model, $timeout, etc) and automatically trigger a $digest cycle.

But Angular doesn’t directly call $digest(). Instead, it calls $scope.$apply(), which in turn calls $rootScope.$digest().
As a result of this, a digest cycle starts at the $rootScope, and subsequently visits all the child scopes calling the watchers along the way.

Now, let’s assume you attach an ng-click directive to a button and pass a function name to it. When the button is clicked,AngularJS wraps the function call within $scope.$apply(). So, your function executes as usual, change models (if any), and a $digest cycle starts to ensure your changes are reflected in the view.

When do we need to use $apply() manually?

If AngularJS usually wraps our code in $apply() and starts a $digest cycle, then when do you need to do call $apply() manually?
Actually, AngularJS makes one thing pretty clear. It will account for only those model changes which are done inside AngularJS’ context Angular’s built-in directives already do this so that any model changes you make are reflected in the view.
However, if you change any model outside of the Angular context,(For example if we update a model using a jquery plugin) then you need to inform Angular of the changes by calling $apply() manually. In these cases either we can call to $apply() or $digest() to kick of a digest cycle for dirty checking , but its always recommended to use $apply() as it has built in error handling mechanism.

Preventing Clickjacking Attacks in ColdFusion

What is Clickjacking Attack?
As per OWASP,
Clickjacking, also known as a “UI redress attack”, is when an attacker uses multiple transparent or opaque layers to trick a user into clicking on a button or link on another page when they were intending to click on the the top level page. Thus, the attacker is “hijacking” clicks meant for their page and routing them to another page, most likely owned by another application, domain, or both.

Lets see an example:

  1. A visitor is lured to evil page. No matter how, may be by clicking on an email.
  2. This page will contain a link called “Get FREE IPOD” with z-index set to -1;
  3. This page also contains a transparent iframe from the victim domain, say facebook.com and positions the facebook like button right over the link.So now the facebook like button is not visible , but the “Get FREE IPOD” link is visible. Now if the user will clickon this link unknowingly he is clicking of the facebook like button.

Here is an example:

<html>
    <head>
        <script>
          window.fbAsyncInit = function() {
            FB.init({
              appId      : '754831697896892',
              xfbml      : true,
              version    : 'v2.1'
            });
          };
    
          (function(d, s, id){
             var js, fjs = d.getElementsByTagName(s)[0];
             if (d.getElementById(id)) {return;}
             js = d.createElement(s); js.id = id;
             js.src = "//connect.facebook.net/en_US/sdk.js";
             fjs.parentNode.insertBefore(js, fjs);
           }(document, 'script', 'facebook-jssdk'));
        </script>
        <style>
            iframe { /* iframe from facebook.com */
              width:140px;
              height:100px;
              margin-top: 100px;
              margin-left: 50px;
              position:absolute;
              top:0; left:0;
              filter:alpha(opacity=50); 
              opacity:0.5;   //Here we have set the opacity to 0.5 so its partly visible, we can make it 0 to hide the iframe
            }
            .a{
                margin-top: 95px;
            }
        </style>
    </head>
    <body>
        <div class="a">
            <a  href="http://www.google.com" target="_blank" style="position:relative;left:20px;z-index:-1">Get Free IPOD!</a>
        </div>
        //www.facebook.com/plugins/like.php?href=https%3A%2F%2Fwww.facebook.com%2FTimesnow&width&layout=button&action=like&show_faces=false&share=false&height=35&appId=754831697896892
    </body>
</html>

JS fiddle: http://jsfiddle.net/5e5kvxk4/4/

Facebook Like button,twitter Follow button already attacked this way multiple times before.http://nakedsecurity.sophos.com/2011/03/30/facebook-adds-speed-bump-to-slow-down-likejackers/.

Q. Does my site is vulnerable clickjacking attacks?

If  there is an action on your site that can be done with a single click – it may be clickjacked.

Defense:

The most common defense, called frame busting, prevents a site from functioning when loaded inside a frame. But there are some cases where the page is intended to be open inside an iframe for example facebook Like and twitter Follow buttons. So they suffer from clickjacking attacks. So to prevent this kind of attacks facebook and twitter opens a popup asking for confirmation when user clicks on the iframe.

Frame Busting:

This is the technique which prevents a site from loading inside an iframe. This technique is very easy to implement also. We just need to add ‘X-Frame-Options’ to our response header. This option is used to indicate the browser weather or not to allow a page render inside <iframe>,<frame>,<object>.

There are three possible values for X-Frame-Options:
DENY
The page cannot be displayed in a frame, regardless of the site attempting to do so.
SAMEORIGIN
The page can only be displayed in a frame on the same origin as the page itself.
ALLOW-FROM uri
The page can only be displayed in a frame on the specified origin.

We can configure at web server level to send X-Frame-Options header for all pages of our site.

IIS

<system.webServer>
  ...
  <httpProtocol>
    <customHeaders>
      <add name="X-Frame-Options" value="SAMEORIGIN" />
    </customHeaders>
  </httpProtocol>
  ...
</system.webServer>

Apache

Header always append X-Frame-Options SAMEORIGIN

Configuring Coldfusion server for preventing Clickjacking attacks:

  1. Open the file Web.xml located inside server-root/WEB-INF.
  2. Now we can add filter mappings for our application with one of the two filters already specified.
    CFClickJackFilterSameOrigin or CFClickJackFilterDeny.
  3. Now let’s say we have an application testsite, which we want to protect against clickjacking by denying a frame for the application. To do so, add the following in the web.xml file.
    <filter-mapping> 
        <filter-name>CFClickJackFilterDeny</filter-name> 
        <url-pattern>/testClick/*</url-pattern>
    </filter-mapping>

Inheritance In JavaScript

In my previous blog I had discussed about creating Objects in JavaScript. As we know JavaScript is a class-less language,so in this blog I will discuss about how Javascript supports inheritance at Object level. Javascript supports prototypical inheritance instead of regular classical inheritance.

Now lets discuss about two important concepts of prototypical inheritance in JavaScript, i.e __proto__ and prototype.

prototype
prototype is a property belonging only to functions. It is used to build __proto__ when the function happens to be used as a constructor with the new keyword.

__proto__
It is a property that all objects have and  pointing to its prototype. This is the property which is used by the JavaScript engine for inheritance. __proto__ is the actual object that is used in the lookup chain to resolve methods.According to ECMA specifications it is supposed to be an internal property, however most vendors allow it to be accessed and modified.

Ex:

function Point(x, y) {
   this.x = x;
   this.y = y;
}
var myPoint = new Point();
console.log(myPoint.__proto__ === Point.prototype); //true
console.log(Point.__proto__ === Function.prototype);  //true

Here Point is a constructor function, it builds an object (data structure) procedurally.
As myPoint is an object constructed by Point(), so Point.prototype gets saved to myPoint.__proto__ at the time of object creation.Point is a constructor function,so it has a prototype property.In javascript functions are also treated as objects,
So Function.prototype gets saved to Point.__proto__   at the time of creation of the function.

CaptureNow lets discuss about how we can inherit objects in JavaScript using prototypical inheritance.

Inheriting a Object created using Object literal syntax:

Object.create():

Douglas Crockford created the Object.create() method, which is used in a fundamental way to implement inheritance in Javascript.The crux of the matter with this Object.create method is that we pass into it an object that we want to inherit from, and it returns a new object that inherits from the object we passed into it.

Ex:

var Point = {x:4 , y:5};
var ColorPoint = Object.create(Point);
ColorPoint.color = "Red";
console.log(ColorPoint.__proto__ === Point);  //true  
console.log(Point.__proto__ === Object.prototype); //true

This creates a new object named ColorPoint by inheriting the properties of Point object and added a new property called ‘color’. Object.create() method simply sets the __proto__ property of ColorPoint object to Point object. This is called as prototypical inheritance.

Inheriting a Object created using constructor function:

In this case to implement inheritance we will write our own custom function named inheritPrototype(childObj,parentObj) which will accept the child and parent object as function parameter and will set the childObject prototype to parentObject’s prototype, so that child object can inherit everything from parent object. Let’s see how we can do this.

Ex:

// constructor of Point object
function Point(x,y){
    this.x = x;
    this.y = y;
}
Point.prototype = {
    dist: function(){
        return Math.sqrt((this.x*this.x)+(this.y*this.y));
    },
    toString: function(){
         return "("+this.x+", "+this.y+")";
    }
}

Here we have created Point Object’s constructor and added to methods to its prototype. These two methods will be shared by all the instances of Point Object.

// constructor of ColorPoint Object
function ColorPoint(x, y, color) {
    Point(this, x, y);
    this.color = color;
}
inheritPrototype(ColorPoint,Point);

Here inside ColorPoint constructor we are calling to Point object constructor to set the properties for x any y and then added a new property named Color. Finally, we are calling inheritPrototype method to inherit the methods from Point object to ColorPoint.

function inheritPrototype(childObject, parentObject){

    // so the copyOfParent object now has everything the parentObject has 
    var copyOfParent = Object.create(parentObject.prototype);

    // we are manually setting the constructor of copyOfParent object to childObject,as in the next step we will override the prototype
    of the childObject with copyOfParent.
    copyOfParent.constructor = childObject;

    // we set the childObject prototype to copyOfParent, so that the childObject can in turn inherit everything from copyOfParent 
    (from parentObject).
    childObject.prototype = copyOfParent;
}

inheritPrototype() simply set the the prototype of ColorPoint to Point object’s prototype, so it inherits its methods.

var p = new Point(3,4);
var p1 = new ColorPoint(5,6,"red");
console.log(p.toString());
console.log(p1.toString());

I hope this helped you to understood at least the general concepts of Inheritance in JavaScript.Comment if you have any doubts.

Objects in JavaScript

JavaScript is called as Class-less Object Oriented Language(some says Object Based Language), because in javascript there is no concept of classes , still we have Objects.Functions can be used to somewhat simulate classes, but in general JavaScript is a class-less language.

Out of the three basic properties of a object orient language i.e Encapsulation,Inheritance and Polymorphism, Javascript
supports Encapsulation and Inheritance(though it supports polymorphism, but it is unnecessary to do this in JavaScript, and the result is usually complex code that is not always productive ). Everything in javascript is an object – classes are objects, functions are objects, numbers are objects,objects are objects.

There are two ways to create a JavaScript object:

  1. Literal notation
  2. Constructor functions

Using Literal notation:

var pointObj = {
    x:3,
    y:4,
    getCoordinates: function(){
        return '(' + x + ',' + y + ')';
    }
}

So we have just created a object in javascript named pointObj having two properties x and y and a method named getCoordinates(). Normally literal notation is preferred if we are using this object as a single object and not requiring
more than one instance of the object.

Using Constructor functions:

var Point = function(x,y){
    this.x = x;
    this.y = y;
    getCoordinates = function(){
        return '(' + this.x + ',' + this.y + ')';
    }
}
var pointObj1 = new Point(1,2);
var pointObj2 = new Point(3,4);

So here we have created two  pointObj using a constructor function and this method is preferable when we require multiple instances of the object where each instance can be changed during the lifetime of the script.

Note: JavaScript also provides a special constructor function called Object() to build the object. The return value of the Object() constructor is assigned to a variable.

var point = new Object();
point.x = 5;
point.y = 6
point.getCoordinates = function(){
    return '(' + this.x + ',' + this.y + ')';
}

What is prototype in JavaScript?

In JavaScript, each Object can inherit properties from another object, called it’s prototype. When evaluating an expression to retrieve a property, JavaScript first looks to see if the property is defined directly in the object. If it is not, it then looks at the object’s prototype to see if the property is defined there. This continues up the prototype chain until reaching the root prototype.

Why to use prototype?
In all of the above example, you may notice that I have defined the methods inside the object, this means  the method getCoordinates() is recreated  every time we create a new object. So if we will create 100 points , then each point will contain their own copy of getCoordinates() method.
A more inexpensive way is to add getCoordinates() method to the prototype of the constructor function.
Ex:

var Point = function(x,y){
    this.x = x;
    this.y = y;
}
Point.prototype.getCoordinates = function(){
    return '(' + this.x + ',' + this.y + ')';
}

Now the same method will be shared between all the objects and will take less memory.So we should always consider defining the methods on the prototype of the  object. Now if we will create an instance of Point object,

var pointObj = new Point(5,6);

the pointObj will contain a property named  ‘__proto__’  which will point to Point.prototype as Point is the constructor of our new instance.

Geocoding with Google Map API and ColdFusion

What is geocoding?

Geocoding is the process of finding associated geographic coordinates ( latitude and longitude) from other geographic data, such as street addresses, or ZIP codes (postal codes).

Note: Reverse geocoding is the process of converting geographic coordinates into a human-readable address.

Requirement of geocoding in Web Application:

  1. Geocoding allows the quick plotting of the address on a map .

  2. To locate the nearest service center by taking the customer address as input.

  3. Used in internet advertising[ to deliver targeted advertising banners based on the location of the website visitor’s IP address. ]

  4. To provide better search results depending upon the location.

  5. In a particular company’s website, to implement functionalites like “Find a Nearest Store”,by which a user can locate the nearest store.

Available Geocoding APIs:

There are several geocoding APIs available in the market.Some of the frequently used free APIs are:

  1. Bing Maps from Mircosoft

  2. Google Map API

  3. Cloudmade Geocoding

  4. Data Science Toolkit

  5. MapQuest Geocoding API

  6. Yahoo PlaceFinder API

In terms of speed,efficiency and correctness Bing Map and Google Map APIs are considered to be the best one as they cover most of the places in the world.

In this Blog, I will give an example of Integrating Google Map API with ColdFusion to find the driving distance between any two physical addresses.

Key Points to remember while using Google Map API:

  1. The google geocoding API has certain usage limits like for normal account it is 2,500 requests per day. While for business customers it is 100,000 requests.For more information please visit: https://developers.google.com/maps/faq#usagelimits

  2. All the addresses must be in a proper format which can be easily recognized by google map API. Suggested format [Full Street Name,City,State,Zipcode]

Finding distance between two places using ColdFusion and Google Map API:

Steps to Find distance between any two physical addresses.

  1. Find the Latitude and Longitude of the two places. [Using Google Geocoding API]

  2. Find the driving distance between the two coordinates.[Using Google Distance Matrix API]

Step 1:

Find the Latitude and Longitude of the two places.

This is a simple function which will take the user address as input and will return the lattitude and longitude in a structure.

<cffunction name="findLatLong"  output="false" returntype="struct">
        <cfargument name="street" type="string" required="true" >
        <cfargument name="city" type="string" required="true">
        <cfargument name="state" type="string" required="true">
        <cfargument name="zip" type="string" required="true">
<!--- Replacing all the spaces with '+' and removing ',' --->
        <cfset VARIABLES.loc_street=trim(replacenocase(replacenocase(ARGUMENTS.street," ","+","all"),",","","all"))>
        <cfset VARIABLES.loc_city=trim(replacenocase(replacenocase(ARGUMENTS.city," ","+","all"),",","","all"))>
        <cfset VARIABLES.loc_state=trim(replacenocase(replacenocase(ARGUMENTS.state," ","+","all"),",","","all"))>
        <cfset VARIABLES.loc_zip=trim(replacenocase(replacenocase(ARGUMENTS.zip," ","+","all"),",","","all"))>
        <!---Creating an address string in proper format for google maps(Streetname,City,State,Zipcode) --->
        <cfset VARIABLES.urladdress="#loc_street#,#loc_city#,#loc_state#,#loc_zip#">
        <cftry>
            <cfhttp result="geocode" url="http://maps.googleapis.com/maps/api/geocode/xml?address=#urladdress#&sensor=false" method="get">
                <cfhttpparam type="header" name="Content-Type" value="text/xml">
            </cfhttp>
            <cfset VARIABLES.gcode = "#xmlparse(geocode.filecontent)#">
            <cfif VARIABLES.gcode.geocoderesponse.status.xmltext EQ "OK">
                <cfset VARIABLES.newlat = "#VARIABLES.gcode.geocoderesponse.result.geometry.location.lat.xmltext#">
                <cfset VARIABLES.newlon = "#VARIABLES.gcode.geocoderesponse.result.geometry.location.lng.xmltext#">
                <cfset VARIABLES.gcodefail = 0>
            <cfelse>
                <cfset VARIABLES.newlat = "0">
                <cfset VARIABLES.newlon = "0">
                <cfset VARIABLES.gcodefail = 1>
            </cfif>
 
            <cfcatch>
                <cfdump var="#cfcatch#">
                <cfset VARIABLES.newlat = "0">
                <cfset VARIABLES.newlon = "0">
                <cfset VARIABLES.gcodefail = 1>
            </cfcatch>
        </cftry>
        <cfset VARIABLES.locationstruct=structNew()>
        <cfset VARIABLES.locationstruct.latitude=newlat>
        <cfset VARIABLES.locationstruct.longitude=newlon>
        <cfset VARIABLES.locationstruct.gcodefail=gcodefail>
        <cfreturn VARIABLES.locationstruct>
    </cffunction>

Step 2:

Find the driving distance between the two coordinates.

This function will take the latitude and longitude of two places and will return the driving distance and time required in a structure format.

<cffunction name="googleGeoCodeify" access="remote" output="true" returntype="struct">
   <cfargument name="location1_lat" type="numeric" required="true">
   <cfargument name="location1_long" type="numeric" required="true">
   <cfargument name="location2_lat" type="numeric" required="true">
   <cfargument name="location2_long" type="numeric" required="true">
        <cftry>
            <cfset VARIABLES.drivingdetails = structnew()>
            <!--- build querystring to send to google --->
            <cfset VARIABLES.googlequerystring="origins=#ARGUMENTS.location1_lat#,#ARGUMENTS.location1_long#">
            <cfset VARIABLES.googlequerystring=googlequerystring & "&destinations=#ARGUMENTS.location2_lat#,#ARGUMENTS.location2_long#">
            <cfset VARIABLES.googlequerystring=left(googlequerystring,len(googlequerystring)-1)>
            <cfset VARIABLES.googlequerystring=googlequerystring & "&mode=driving&language=en&avoid=tolls&units=imperial&sensor=false">
            <cfset VARIABLES.googleurl="http://maps.googleapis.com/maps/api/distancematrix/json?#googlequerystring#">
 
            <cfhttp url="#VARIABLES.googleurl#" method="GET" throwonerror="no" timeout="10"/>
            <cfset VARIABLES.resultstr = deserializeJSON(cfhttp.FileContent)>
            <cfif VARIABLES.resultstr.status eq "OK">
                <cfset VARIABLES.drivingdetails.drivingdistance = REReplace(VARIABLES.resultstr.rows[1].elements[1].distance.text,"[^0-9.]?","","all")>
                <cfset VARIABLES.drivingdetails.drivingtime = REReplace(VARIABLES.resultstr.rows[1].elements[1].duration.text,"[^0-9.]?","","all")>
            <cfelse>
                <cfset VARIABLES.drivingdetails.drivingdistance = "-999999">
                <cfset VARIABLES.drivingdetails.drivingtime = "-999999">
            </cfif>
 
            <cfcatch>
                <cfset VARIABLES.drivingdetails.drivingdistance = "-999999">
                <cfset VARIABLES.drivingdetails.drivingtime = "-999999">
                <cfdump var="#cfcatch#">
            </cfcatch>
        </cftry>
        <!--- return the struct with requrired driving distance and time --->
        <cfreturn VARIABLES.drivingdetails>
 </cffunction>

Example:

<cfset source = findLatLong('300 Boylston Ave E', 'Seattle', 'WA', '98102')>
<cfset destination = findLatLong('555 N 105th St','Seattle','WA','98133')>
<cfset distance = googleGeoCodeify(source.latitude,source.longitude,destination.latitude,destination.longitude)>
<cfdump var="#distance#">

Autoversioning JS and CSS files using ColdFusion

Before going through the technique of auto-Versioning JS/CSS files, lets first understand,

What is versioning and Why versioning is required?

When we update javaScript or css files that are already cached in user’s browsers, most likely many users won’t get that for some time because of the caching at the browser or intermediate proxy(s). So we need some way to force the browser/proxy to download the latest files. So to do this either we need to change file names or URL of the files each time we change the file. As changing the file names each time after modification is not possible, so we can add a version number to the JS/CSS files to get the latest copy from the server. This technique is called as versioning.

Ex: <script type="text/javascript" src='js/global.js?v=1.2'></script>

Problem With this Approach:

The above mentioned technique works fine when we have less number of js/css files in our project. Soon it becomes very cumbersome to maintain when the project gradually becomes larger and involves a lot of js/css files for different modules.
As each time we modify some js/css files we need to update the version number in all the files where these files are included. To overcome from this problem normally 2 approaches are used by developers are:

  • 1st Approach:
    Declare a global constant called VERSION, and use this CONSTANT with all the js/css files.So with each new release we can change the verisonnumber. Ex:

    <cfset version = 1.1>
    <cfoutput>
         <script type="text/javascript" src="a.js?v=#version#"></script>
    </cfoutput>

    The problem with this approach is,
    Let’s say we are having 20-30 js/css files are used in our project, Suppose for the current release we have modified only 2/3 js files. Now we need to change the global version number.So by changing the global version number it will force all the js/css files to be reloaded again but will not use the cache. This creates very bad user experience for sites having huge traffic.

  • 2nd Approach:
    One better solution is to append the file last modified date time as the version number so that each time we modify a file, the user will get the latest copy of the file.This is called as auto versioning.

     Ex:<cfset  lstModified = getfileInfo("c:\test_prj\js\global.js").lastmodified >
     <cfoutput>
          <script type="text/javascript" src="a.js?v=#lstModified #"></script>
     </cfoutput>

It looks like a better solution, still there are some issues with this approach.
As per Google Caching Best Practices , It says not to use a query string with static file names,because it does not use cache for those files.

Don’t include a query string in the URL for static resources. Most proxies, most notably Squid up through version 3.0, do not cache resources with a “?” in their URL. To enable proxy caching for these resources, remove query strings from references to static resources, and instead encode the parameters into the file names themselves.

So what is the best solution?

So the best solution to auto version js/css/image files involves two steps.

  1. Append the last modified date time with the file name itself .
  2. Set up redirect rule on the server. The redirect rule is to redirect any files located in our \scripts\ or \css\ folders with version numbers in between the file name and the extension back to just the filename and extension. For example, I could now rewrite the url “/css/structure.css: as “/css/structure.1234.css” and Apache/IIS would see those as the exact same files. This approach is used by most of the high traffic sites like Amazon, Google etc.

So now in this way each time we modify some js/css/image file, we just do not need to change anything else on the production server, It will automatically refresh only those files that are modified and even cache the files as there is no query string appended to the file names.

AutoVersioning files using ColdFusion:
It involves two steps,

Step1:
First we need to add these redirect rules.

For IIS: 
Add this to the web.config:
 <rewrite>
            <rules>
                <rule name="caching">
                    <match url="^(.*)([0-9]{10}\.)(css|js)$" />
                    <action type="Rewrite" url="{R:1}{R:3}" />
                </rule>
            </rules>
        </rewrite>
For Apache:
Add this to .htaccess:
RewriteRule ^(scripts|css)/(.+)\.(.+)\.(js|css)$ $1/$2.$4 [L]

Step2:

<cffunction name="autoVersion" access="public" output="true" returntype="string" >
    <cfargument name="fileName" type="string" required="true" >
    
    <cfset var absPath = expandPath("#ARGUMENTS.fileName#")>
    <cfif !fileExists(absPath)>
        <cfreturn fileName>
    </cfif>    
    
    <!--- get the last modified datetime of the file --->
    <cfset  lstModified = getfileInfo(absPath).lastmodified >
    
    <!--- get the unix timestamp --->    
    <cfset  mtime =  dateDiff("s", "January 1 1970 00:00", lstModified)>
    <cfset var fileNameWithTimestamp = listFirst(ARGUMENTS.fileName, '.') & '.' & mtime & '.' & listLast(ARGUMENTS.fileName, '.')>
    <cfreturn fileNameWithTimestamp>
    
</cffunction>    

<cfoutput>
    <html>
        <head>
            <link rel="stylesheet" href="#autoVersion('css/myStyle.css')#" />
        </head>
        <body>
            
        </body>
    </html>
</cfoutput>